

Creating Photo Art
Although “plain” photography is my first love, I have also been branching out into photo art the past year or so. I am forever amazed at what a difference layering on different textures can make between a photo’s start and end.

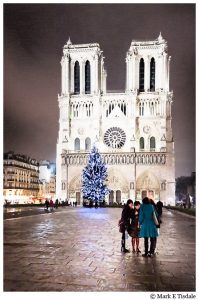
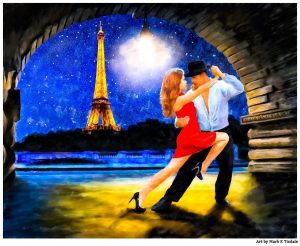
This is my most recent piece of photo art. Quite honestly, the beginning photo was really just intended to be a personal photo. It was my first night in Paris, and by the time I got settled in to explore it was well past dusk and into inky night. If I was trying to take a photo at this time for print purpose, I would have filled the frame with something aside from the inky night sky to the right in the original frame. All that said, I do *like* the starting photo, and I could certainly have dodged and burned a bit to bring out more details and balance the photo. As I said, though, for all intents, this was just a photo to remember my first night visiting Paris.
And here is where the magic of layers in photoshop enter the picture. You may be wondering what texture layers are? They can be a lot of things! A photo of broken concrete, a picture of a cracked wall, photos of peeling paint, scans or photos of cloth and old yellowed letters and paper. The sky is probably the limit here! Heck, it could be a picture of the sky! It’s somewhat akin to the old days when you took multiple exposures on the same roll of film, often done accidentally. The results are somewhat unpredictable but you do begin to get an idea of what textures you may want. In this case, I know there were multiple layers of rough concrete and some cloth involved. If anyone is interested, I will try to retain the layers on a future project and provide a more detailed example of the steps. I normally do not save the layers in the end because of the huge amount of space the resulting file takes.

There’s more, of course, than just stacking layers of hypothetical concrete pictures on top of your photo, because obviously, if you stack playing cards one on top of the next, you won’t see the playing cards at the bottom anymore, this is where a couple of photoshop tools become very important. What you see to the right is the menu that you can activate on each layer to change the way they interact with one another. If I take my picture of Notre Dame and add a photo of cracked concrete over it, I want my bottom layer to show through a bit. There is an opacity option in photoshop as well so I can make the top layer somewhat ghostly, and I do use that to control the amount of the effect sometime, but my favorite controls are to the right. And knowing which one to select is one part experience and one part trial. It costs you nothing to put that layer of concrete over Notre Dame and click through each of these until you get an effect that you like. You can also go back and change it at will. In my experience, I often also add copies of the original photo and also vary the blending options on that as well. Maybe I added a layer of concrete, but I want to bring back more of the color of the original image for instance? Heck, even taking your original photo and just duplicating it with a different blending option can create some pretty novel results.
The gist of it is keep trying. You may end up dumping every layer you started with in the beginning. On more than one occasion, I’ve dumped my original texture layers when I find something that has more impact on a particular photo. You can also reduce the effect through the opacity controls and layer masks or even lightly erasing part of the adjustment layers that you don’t like.

I don’t think you can entirely appreciate the results with textures without seeing a close-up. This crop is not quite 100% of the final image (still too large to easily fit here), but I wanted enough for you to see some of the textures that shine through, particularly the woven cloth texture.
This is by no means intended to be an in depth step by step how to post, just giving some insight to the process and suggesting that there’s a world of information out there on how to do this. Feel free to ask questions and I’ll try to help where I can. Also be aware that although I’m using Photoshop for this, you don’t have to shell out money on Photoshop to do the same thing, there’s a free alternative called Gimp. I don’t have any real experience with Gimp, but my understanding is that the interface is not the same but it has the same capabilities.
There are repositories of textures online – typically with the request that you share the final results or possibly that your work is non-commercial. Google is your friend on this one. But, and I think more interestingly, it leads you to look at the things you photograph in a whole new way. Sure that old building is neat, but wow, look at the peeling paint on that fence! Imagine the results of that in your textures!
If you enjoyed this, you might want to explore more of my artwork over on Beautiful World Art.